Cucumber-JVM allows parallel execution across multiple threads since version 4.0.0. There are several options to incorporate this built-in feature in a Cucumber project. You can do so using:
For each of these options, this tutorial will look at the project setup, configuration settings and execution commands.
JUnit
Cucumber can be executed in parallel using JUnit and Maven test execution plugins. In JUnit the feature files are run in parallel rather than scenarios, which means all the scenarios in a feature file will be executed by the same thread. You can use either Maven Surefire or Failsafe plugin to execute the runners.
Create a Maven project in your favorite IDE using the cucumber-archetype or by adding Cucumber dependencies to the POM as detailed here and Junit dependencies here.
Create a parallel folder (or any other name) in
src/test/resourcespath and add the two feature files (scenarios.featureandscenario-outlines.feature) inside it.
Feature: Scenarios feature file

  Scenario: Scenario Number One
    Given Step from 'Scenario 1' in 'scenarios' feature file

  Scenario: Scenario Number Two
    Given Step from 'Scenario 2' in 'scenarios' feature file
Feature: Scenario Outlines feature file

  Scenario Outline: <scen_out_row_num>
    Given Step from '<scen_out_row_num>' in 'scenario-outlines' feature file

    Examples:
      | scen_out_row_num       |
      | Scenario Outline Row 1 |
      | Scenario Outline Row 2 |
- Add the step definition class to the
parallelpackage (same name as folder above for automatic pickup by runner) insrc/test/javafolder.
package parallel;

import io.cucumber.java.BeforeStep;
import io.cucumber.java.en.Given;

public class StepDefs {

    @Given("Step from {string} in {string} feature file")
    public void step(String scenario, String file) {
        System.out.format("Thread ID - %2d - %s from %s feature file.\n",
        Thread.currentThread().getId(), scenario,file);
    }
}
- Add the step definition class to the
parallelpackage (same name as folder above for automatic pickup by runner) insrc/test/kotlinfolder.
package parallel

import io.cucumber.java8.En

class StepDefs : En {
    init {
        Given("Step from {string} in {string} feature file") { scenario: String , file: String ->
            println("Thread ID - ${Thread.currentThread().id} - $scenario from $file feature file")
        }
    }
}
- Add a cucumber runner using the
RunWithannotation in theparallelpackage (same name as step definition package) in thesrc/test/javafolder.
- Add a cucumber runner using the
RunWithannotation in theparallelpackage (same name as step definition package) in thesrc/test/kotlinfolder.
package parallel;

import io.cucumber.junit.Cucumber;
import org.junit.runner.RunWith;

@RunWith(Cucumber.class)
public class RunCucumberTest {
}
package parallel

import io.cucumber.junit.Cucumber
import org.junit.runner.RunWith

@RunWith(Cucumber::class)
class RunCucumberTest
- Add the Surefire plugin configuration to the
buildsection to thePOM.
<plugin>
    <groupId>org.apache.maven.plugins</groupId>
    <artifactId>maven-surefire-plugin</artifactId>
    <version>2.22.0</version>
    <configuration>
        <parallel>methods</parallel>
        <useUnlimitedThreads>true</useUnlimitedThreads>
    </configuration>
</plugin>
- Use the Maven
installor a suitable command to execute thePOM. This should run in parallel threaded mode. You should see a result similar to below. It is important to note that both the scenarios in the file (scenarios.feature) are executed by thread with ID 14. Similarly both the rows of the scenario outline in the file (scenario-outlines.feature) are executed by thread with ID 13.
Thread ID - 13 - Scenario Outline Row 1 from scenario-outlines feature file.
Thread ID - 13 - Scenario Outline Row 2 from scenario-outlines feature file.
Thread ID - 14 - Scenario 1 from scenarios feature file.
Thread ID - 14 - Scenario 2 from scenarios feature file.
- To execute using a Maven Failsafe plugin include the below configuration in the
buildsection to thePOM. Rename the runner class toRunCucumberIT. You can find further details here.
For Failsafe to find your step definitions, make sure they are in src/test/java.
<plugin>
    <groupId>org.apache.maven.plugins</groupId>
    <artifactId>maven-failsafe-plugin</artifactId>
    <version>2.22.0</version>
    <executions>
        <execution>
            <goals>
                <goal>integration-test</goal>
                <goal>verify</goal>
            </goals>
            <configuration>
                <parallel>methods</parallel>
                <useUnlimitedThreads>true</useUnlimitedThreads>
            </configuration>
        </execution>
    </executions>
</plugin>
To set the thread count to a specific number instead of useUnlimitedThreads use the below setting.
<configuration>
    <parallel>methods</parallel>
    <threadCount>4</threadCount>
</configuration>
The thread count in the above setting is 4 threads per core. If you want this to be 4 threads across all cores set the perCoreThreadCount to false.
<configuration>
    <parallel>methods</parallel>
    <threadCount>4</threadCount>
    <perCoreThreadCount>false</perCoreThreadCount>
</configuration>
In case of multiple runners one can also set the parallel option to classesAndMethods or classes in addition to methods.
<configuration>
    <parallel>classesAndMethods</parallel>
    useUnlimitedThreads>true</useUnlimitedThreads>
</configuration>
TestNG
Cucumber can be executed in parallel using TestNG and Maven test execution plugins by setting the dataprovider parallel option to true. In TestNG the scenarios and rows in a scenario outline are executed in multiple threads. One can use either Maven Surefire or Failsafe plugin for executing the runners.
Cucumber can be executed in parallel using TestNG and Maven test execution plugins by setting the dataprovider parallel option to true. In TestNG the scenarios and rows in a scenario outline are executed in multiple threads. One can use either Maven Surefire or Failsafe plugin for executing the runners.
- Add a cucumber runner by extending the
AbstractTestNGCucumberTestsclass and overriding the scenarios method in theparallelpackage (same name as step definition package) insrc/test/javafolder. Set the parallel option value to true for the DataProvider annotation.
package parallel;

import org.testng.annotations.DataProvider;
import io.cucumber.testng.AbstractTestNGCucumberTests;

public class RunCucumberTest extends AbstractTestNGCucumberTests{

    @Override
    @DataProvider(parallel = true)
    public Object[][] scenarios() {
        return super.scenarios();
    }
}
- Add a cucumber runner by extending the
AbstractTestNGCucumberTestsclass and overriding the scenarios method in theparallelpackage (same name as step definition package) insrc/test/kotlinfolder. Set the parallel option value to true for the DataProvider annotation.
package parallel

import org.testng.annotations.DataProvider;
import io.cucumber.testng.AbstractTestNGCucumberTests;

class RunCucumberTest : AbstractTestNGCucumberTests() {

    @DataProvider(parallel = true)
    override fun scenarios(): Array<Array<(Any)>>  {
        return super.scenarios()
    }
}
- Add the Maven Surefire plugin configuration to the
buildsection of thePOM.
<plugin>
    <groupId>org.apache.maven.plugins</groupId>
    <artifactId>maven-surefire-plugin</artifactId>
    <version>2.22.0</version>
</plugin>
- Use the Maven
installor a suitable command to execute the POM. This should run in parallel thread mode. You should see a result similar to below. The scenarios and rows of the scenario outlines are executed in different threads.
Thread ID - 15 - Scenario Outline Row 2 from scenario-outlines feature file.
Thread ID - 14 - Scenario Outline Row 1 from scenario-outlines feature file.
Thread ID - 16 - Scenario 1 from scenarios feature file.
Thread ID - 17 - Scenario 2 from scenarios feature file.
- To execute using a Maven Failsafe plugin, setup the
POMas described in the JUnit section. Remove theparallelanduseUnlimitedThreadssettings in theconfigurationpart.
The default thread count of the dataprovider in parallel mode is 10. To change this the dataproviderthreadcount property needs to be added to the configuration section of the Surefire or Failsafe plugin in the POM.
<configuration>
    <properties>
        <property>
            <name>dataproviderthreadcount</name>
            <value>20</value>
        </property>
    </properties>
</configuration>
If you have multiple runners, set the parallel configuration to classes to reduce execution times. In addition the threadCount can be set to to the desired value or useUnlimitedThreads can be set to true.
<configuration>
    <parallel>classes</parallel>
    <threadCount>4</threadCount>
</configuration>
CLI
The Main class in the io.cucumber.core.cli package is used to execute the feature files. You can run this class directly from the command line; in that case, there is no need to create any runner class. The usage options for this class are mentioned here. The --threads option needs to be set to a value greater than 1 to run in parallel. When the parallel mode is used, the scenarios and rows in a scenario outline will be run in multiple threads.
Follow the steps below to execute the command from a terminal.
Add the two feature files (
scenarios.featureandscenario-outlines.feature) and step definition class as described in the JUnit section.Open up a terminal window and navigate to the source folder of the project, in this case parallel.
- Compile the step definition class. Add the path to the folder containing cucumber jars to the classpath using the -cp option.
javac -cp .;<path to cucumber jar folder>/* ./parallel/StepDefs.java
- Compile the step definition class. Add path to each of the downloaded cucumber jars to the classpath using the -cp option.
kotlinc -cp .;<path to each cucumber jar> -jvm-target 1.8 ./parallel/StepDefs.kt
- Execute using the below command.
- Execute using the below command.
java -cp .;<path to cucumber jar folder>/* io.cucumber.core.cli.Main --threads 4 -g parallel parallel
java -cp .;<path to cucumber jar folder>/*;<path to kotlin lib folder>/* io.cucumber.core.cli.Main --threads 4 -g parallel parallel
- You should get a console output similar to below.
Thread ID - 11 - Scenario Outline Row 1 from scenario-outlines feature file.
Thread ID - 14 - Scenario 2 from scenarios feature file.
Thread ID - 12 - Scenario Outline Row 2 from scenario-outlines feature file.
Thread ID - 13 - Scenario 1 from scenarios feature file.
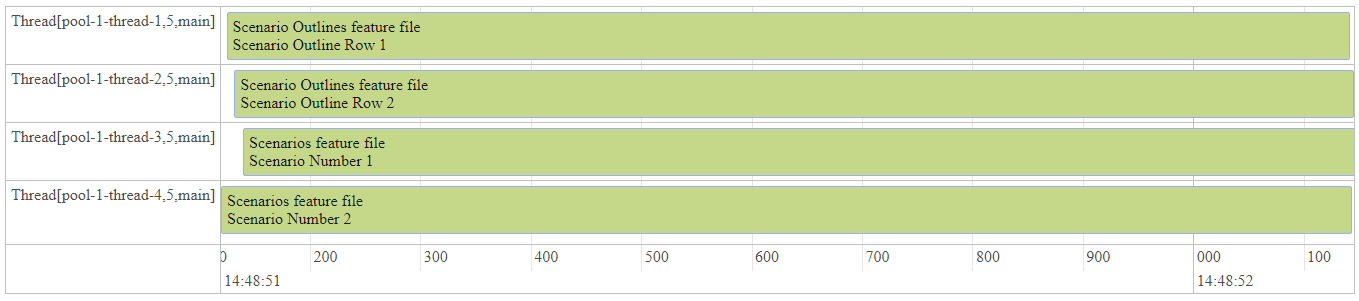
Timeline Formatter
For a visual representation of threads, add the timeline report using the plugin option of CucumberOptions annotation on a JUnit or TestNG runner.
For a visual representation of threads, add the timeline report using the plugin option of CucumberOptions annotation on a JUnit or TestNG runner.
@CucumberOptions(plugin= {"timeline:<report folder>"})
@CucumberOptions(plugin = ["timeline:<report folder>"])
In case of CLI, the below command can be used.
java -cp <classpath> io.cucumber.core.cli.Main -p timeline:<report folder> --threads <thread count> -g <steps package> <path to feature files>
Below is a sample report.
In case of CLI, the below command can be used.
java -cp <classpath> io.cucumber.core.cli.Main -p timeline:<report folder> --threads <thread count> -g <steps package> <path to feature files>
Below is a sample report.